Deck Truss Bridge - May '04
Installed cross-bracing and ties
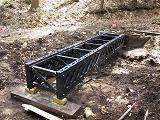
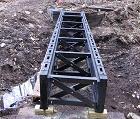
The bridge needs cross-bracing to prevent it from collapsing sideways. This is
critical because a heavy train crossing the bridge (on curved track) will exert
a large lateral force toward the outside of the curve. The structure is braced
at seven equally-spaced points along its length, with each cross-brace
consisting of a pair of 3"x4" horizontal beams plus a pair of diagonals. The
beams are sandwiched between the truss stringers by 34" threaded rods; the
diagonals are attached to the beams with carriage bolts. Seven braces is
overkill - I could probably get away with just three - but I liked how the
extra bracing adds "density" to the bridge's appearance.
Here's a closeup of a cross brace. Each horizontal beam is made of a sandwiched
pair of 2x4's and has a half-inch-square channel running down its center to
accomodate the threaded rod; the rod is bolted on the outside of each truss.
The stacked blocks below the end of the bridge are to adjust side-to-side and
end-to-end leveling.
Here's a view of the bolts (on the ends of the threaded rods) that secure a
horizontal beam. The diamond-shaped things are 3" square pieces of 1/4" thick
steel that act as a large washers - standard washers, which are about 1" in
diameter, would pull into the wood when the nuts are tightened.

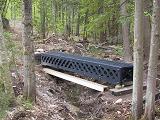
Here's the bridge with all bracing installed.
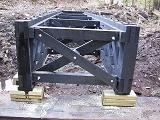
And here's the other end of the bridge. The big pieces of wood on the ground
under the end of the bridge are a pair or used RR ties bolted together
(something I didn't think of doing on the other end); the tie nearest the
camera will be the bottom layer of a header that will look just like the one
at the other end of the bridge.
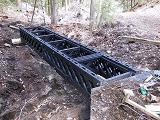
Looking down the center of the bridge.
I installed three crossties because I just couldn't wait to see how the finished
deck will look. Each tie is anchored at each end by a 4" timber screw. The screws
don't require washers but I added them for a more "industrial" appearance. Soon
the length of the bridge will be covered with these 1.5" wide x 2" tall x 32" long
ties spaced every 1.5", and eventually the rails will be fastened to each tie.

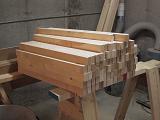
All the crossties have all been cut and drilled, and are awaiting paint before
being installed on the bridge. Each tie is roughly the size of a baseball bat.
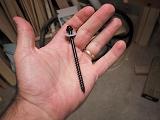
A closeup of a 4" timber screw with its industrial-looking washer.
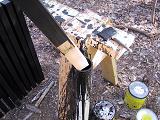
It's easier to paint the bridge's crossties before installing them, so I created
a painting "tool" from a length of 3" diameter PVC pipe that I capped at one end.
I filled the pipe with paint then dunked each tie down the tube, brushed off the
excess paint, let it dry a bit, then dunked the other end. It turned out well,
but 120 dunks is a lot of work!
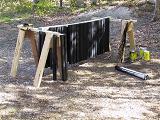
I created a tie-drying rack by driving a bunch of 2" finishing nails into the
sides of a 2x4 that I then laid across a pair of sawhorses. I hung the ties on
the nails using the ties' pre-drilled screw holes. It kinda looks like a giant
black windchime!
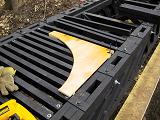
I created a tie-laying jig by nailing some small blocks to the underside of a
piece of scrap plywood. The jig speeds up installation by automatically spacing
and squaring the ties as they're fastened down.
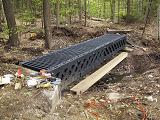
All ties are installed and the bridge is complete! I still need to build the
bulkhead at the far end.
The completed bridge from the other end, artistically framed by some trees.